Polaroid 250 Land Camera
Polaroid 100 Chocolate Giambarba Expired
Bear, DE / July, 2011
Polaroid 250 Land Camera
Expired Polaroid 100 Chocolate Giambarba Peel Apart Film
Enlarged and printed on
Hahnemühle William Turner 310 gsm paper
Float Mount
Sizes and Pricing
Limited Signed Edition of 10 Float Mount*
24″ x 19.5″
Edition 1 – 4: $425
Edition 5 – 8: $500
Edition 9: $625
Edition 10: Held by the artist
Unmounted signed 24″ x 19.5″ prints: $100
Unmounted signed 10″ x 8″ prints: $40
The only editing done on the photo was dust removal using Photoshop CS5. All colors match the original Polaroid.
* Why float mount instead of frame? Float mounts were chosen to showcase an enlarged
version of the Polaroid image, as if the Polaroid itself was mounted on the wall.
Float mounts are archival, museum quality, and hang with traditional wall hooks.
A floated image mounts on the wall beautifully, especially when the image is a Polaroid:
September 1 – September 15, 2011 Packard Reath Gallery
Lewes, DE
&
September 17 – September 30, 2011 Gallery 50
Gallery 50, Rehobeth, DE
As part of Photomonth 2011 (advanced skills category), a show juried by:
Lee Wayne Mills
Ellen Elms Notar
John Burger
Dinah Reath
Jay Pastore
$600
June 19, 2011
26″ x 20¼”
Polaroid 250 Land Camera
Expired Polaroid 100 Chocolate Giambarba Peel Apart Film
Enlarged and printed on
Hahnemühle William Turner 308gsm Paper
Museum Mount
Limited Edition 1 / 5
The only editing done on the photo was dust removal using Photoshop CS5. All colors match the original Polaroid.
15% of all proceeds will be donated to a local preservation society.
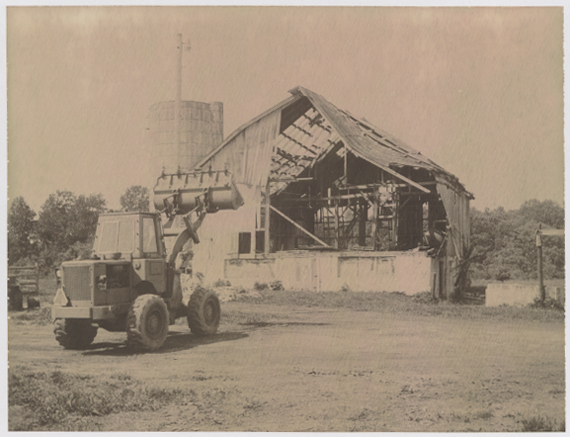
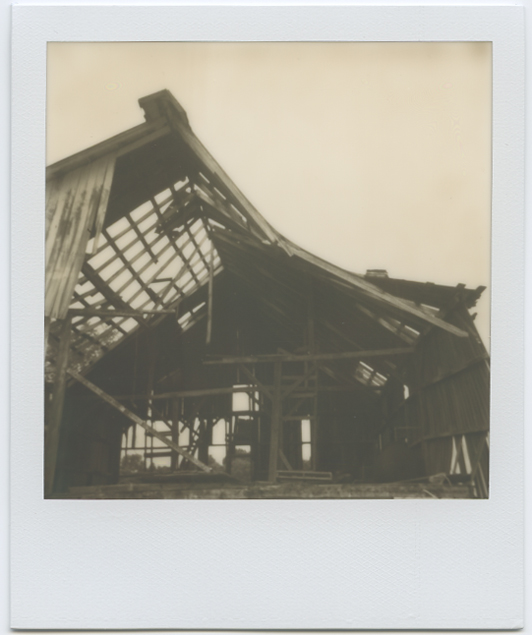
On Saturday, May 21, 2011, beginning at 3:00 in the afternoon, the barn at 2335 McCoy Road was razed. This is part 1 in a 2 part post about the razing and details the events photographed with my Polaroid 250 Land Camera using Polaroid 100 Chocolate Giambarba Expired (10/2009 if I’m correct).
Construction Unlimited, the owners of the barn and the property around it, had been planning on razing the barn for weeks. But, delays and then a week of rain had out it off. Finally, the day was set. Unfortunately, they decided the barn would be razed in the afternoon, which meant that all the gorgeous morning light that hits the eastern facing front of the barn would be lost. I had no idea, really, how the Polaroid 250 and Chocolate film would handle the strong sunlight. At 2:30, after a morning of putting together new deck furniture, I hurried over to the barn to see what was going on. They were just getting started attaching a rope to one of the inner rafters. The rope would then be attached to a bulldozer. I quickly set up two cameras, the Polaroid 250 and my Nikon D90, on two tripods and the Flip video camera on a third tripod. Thankfully they decided to start by pulling the rafter in to the south which meant that the sunlight was slightly behind me and I would also set up the cameras in the share of a tree. Anticipating a dramatic crash at any moment, I have way too many photos that look something like the below image. I chose this one because it seems like the earth mover is in the process of bowing in deference to the barn. And, indeed, the barn won this round: the rope snapped in half without the barn even budging (Barn 1 – Machine 0).
We then shifted to the eastern face of the barn. I started to become much more conservative in pressing the shutter, especially because they tied the rope to some metal dangling off the wall (if you look closely just below center you can see the rope draping into the grass). The result: the metal was pulled off; the barn didn’t budge (Barn 2 – Machine 0).
Next, they sent an employee to get some chains and we switched back to the southern face. While waiting for the chains, they thought that attacking the barn with the earth mover would work. They splintered off a (massive) beam (Barn 3 – Machine 0).
With the chains attached, the barn started to lose ground—though the earth mover struggled. It was incredible to watch 200+ year old construction resist the earth mover—especially because we knew the new construction across the street would have toppled with just the rope attached. It was also, quite sad (Barn 3 – Machine 1).
We then shifted to the north face and it was here that I got quite worried about the photos. I was now facing into the sun and I had no idea how the Polaroid 250 would handle it. Worried the photo would be completely blown out, I made a slight adjustment on the brightness wheel to darker. I’m pleased with the darker colors and really likethe lens flare in the bottom left corner. After some planning, they attached the chains to the north-east support beam (Barn 3 – Machine 2):
The moment the barn fell with great destruction was completely chaotic. I had just set up the cameras in a new location so I could get the barn and the earth mover in the frame. I was still getting ready when all of a sudden the earth mover was moving. I was cocking the level, snapping the shutter, pulling the paper, and pulling the photo through the rollers in a frenzy, while simultaneously trying to hold the shutter down on the D90 (my wireless remote shutter was not working—must get wired one immediately). This photo, which has an unfortunate dark area, succinctly captures the chaos. It is slightly out of focus, has tons of movement, and may even be a double exposure (if possible on the 250) (Barn 3 – Machine 3):
And here, the final shot in that pack of film, is the barn partially razed. When in the field I usually peel the goopy border off the photo immediately, but I knew it was my last shot so I decided to keep it on:
In Part 2 of this series, I will detail the rest of the razing as documented with my Canon AE-1.
Since the barn at 2335 McCoy Road was not knocked down two weeks ago as had been planned (demolition is now scheduled for this coming weekend) I took the opportunity to try out two Impossible Project films: PX 600 Silver Shade version 06, which came in a twin pack with the Dry Age Kit, and PX 100 Silver Shade
Polaroid Impulse AF by Boxy Brown's Bling
The PX 600 is being used in a Polaroid Impulse AF that belonged to my paternal grandmother, Toby Wolff, who passed away two years ago at the age of 99 and 1/2. She was an avid Polaroid user and I’m so happy to have her last Polaroid camera, hard black Polaroid case, and many Polaroid photos that she took of the family. The other camera is a Polaroid Pronto! S that belonged to my maternal grandparents, Maurie and Harriet White, who are both in their 90s and still living. The Pronto! was in my grandfather’s camera bag that he gave to me a few years ago along with a Canon AE-1 and a Canon A1 Program. I had no idea that he had the Polaroid and I was happy to find it in a soft beige Polaroid case with the user’s manual and a flash bar.
Because the Impulse AF has a tripod mount, it and PX 600 were the first to be tested. It was May 9, 2011, and though I had read about the film’s sensitivity to temperature, that it has to be used between 63 and 77 degrees, I was brazen and brought it out on a crisp, cool, color-saturated morning in the upper 50s, while I was photographing the barn with Fuji 100 color peel apart film on my Polaroid 150 Land camera. The results:
Developed in the shade at around 60 degrees F.
Developed in the sun at around 60 degrees F.
I knew after seeing these images that the temperature was the most likely culprit, but I was worried about the vertical striations in the second image. So I could be sure that the camera wasn’t broken, I took a photo of my wife feeding my son some organic applesauce. The interior temperature was around 72 degrees F. I was relieved and, in fact, amazed by the color shades and crispness in the result:
Before heading out to test the film again, I went back to the The Impossible Project’s PX film optimization page and found The Mijonju Show’s video, “Tricky PX100 films,” which led me to The Mijonju Show’s “PX100 Side by side temperature experiment.” It shows very well how sensitive PX film is to temperature:
After seeing the video I suspected that the striations were the result of me not covering the image fast enough. As a result, using gaffer’s tape I dangled part of a Polaroid Chocolate film box from the front of the camera so when the image would come out the Impulse it would be covered.
On the evening of May 12, 2011, when it was about 72 degrees outside with a bright sunset, I went for my second test of the 600 film. A sample of the results:
Though I was very happy the images were appearing with more consistency, and the darker tones suggested I was covering the images better as I got used to the process, I wasn’t pleased that the striations were still appearing. The third photo also looked like it has some lens flare in the center right. The only thing I thought that could be causing the striations and lens flare was that the ever so brief moment that the sun hit the image as it came out of the camera. If I had realized this sooner I would have taken my umbrella out of the car and used it as a lens shade, but, alas I didn’t.
Yesterday evening, May 19, 2011, with thick clouds overhead and a nice 68 degrees F, I tried again. Instead of using my hand to cover the film as I moved it from the camera to the Tupperware container I was using to hold the film as it developed, I used an inverted and then folded up a box that once held Polaroid 664 Twin Giambarba Expired film. As soon as the photo was out of the camera and under the cardboard flap that was dangling from the camera, with my left hand I slid the image out and under the folded box. I then rushed the photo to the Tupperware container (which, I must add, I wrapped with black Gaffer’s take so no light would get in through the bottom and sides). I also used the folded box to keep the dangling cardboard down and put pressure on one side of it so light couldn’t get in from the side; the other side I covered with my left hand immediately after pressing the shutter. Here are the results in the order the images were taken:
I attempted to make a duplicate of this image because I wasn’t happy with the how the right corner of the roof blurred and went out of the frame in the first photo. I was, however, careless and my hand slipped as the film came out of the camera. The result is the vertical striation. Interestingly, my wife likes this one better.
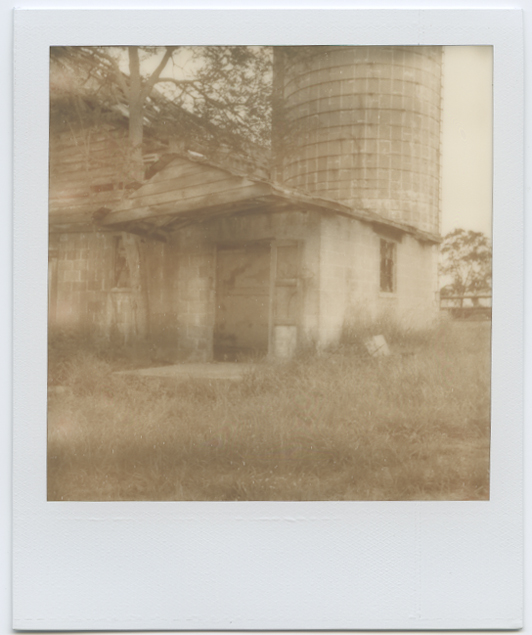
I also still blown away by the level of detail in these photos, especially considering the camera is so old and hadn’t been used for at least a decade. I particularly love the depth of the detail in, for example, 4th and 6th photos. In the 4th, the inner door and trees beyond are very clear even at this low resolution scan. In the 6th, through the inner window we can see the straps that wrap around a silo. The tones and shades are also quite impressive and compliment quite well the subject. Most gratifying, however, is working through making an effective image with new film and a new camera. Using a Polaroid is like working a complex puzzle (just like using toy cameras). There are so many factors involved in order to make an effective image beyond those that go into traditional composition. Thinking about the weather and the temperature. Calculating development times. Crafting little tools to help the image develop properly (we also see this using the Holga when I add portions of folded film boxes to ensure the film is taught and by wrapping the seams in gaffer’s tape). This is the joy of photographing with instant film and toy cameras.
Polaroid Pronto by Capt Kodak
And, there is never any end to the puzzles that one is confronted with. For example, consider the Polaroid Pronto! S. First challenge: there is no tripod mount. A little gaffer’s tape and whallah: a Pronto! attached quite soundly to my travel tripod (note the cardboard dangling from the front, as well):
Here are the photos made with the Pronto and PX 100 Silver Shade Film, taken at the exact same time as the above PX 600 successful images, in the order they were recorded:
I suspect the dust is a result of dirty rollers, which I carelessly forgot to clean. The striations are as a result of not perfecting the process of covering the image as it comes out of the camera.
Here, more dust and some spots to the left. Not sure why those appear.
It’s hard to tell on my screen, but the black areas in this image have turned red. I like the effect and wish I knew why it was happening so it could be replicated. The image could be a bit darker.
Again, some blotches on the left edge. Perhaps a light leak?
Striations and blotches, the former a result of my hand slipping.
So, lot’s to figure out with the Pronto!—though, my wife really likes these images. “They have an old feel to them,” she says. I didn’t use all the film because it was getting too dark and I was getting hungry. I’ll need to buy some new film and Dry Kits, though, because I totally love this film. It’s too bad I didn’t start using it early because these will be the only images of the barn before it is razed this weekend.
On Wednesday, April, 20, 2011, I woke up and looked at the weather app on my iPhone (as I do every morning) and saw that it was foggy out. I had been waiting for a foggy day to get out early and take photos of the barn and landscape at 2335 McCoy Road in the fog. I leaped out of bed opened the blinds and, eureka, fog! I put Hydan in the cars eat and rushed out of the house to take some photos with a role from my new batch of Polaroid 100 Chocolate Giambarba Expired. The results were both surreal and unexpected. The Chocolate film is supposed to have a sepia tone to it, as in my other Chocolate Polaroid photos. Not this time it seems. The brownish tint is hinted at in the foreground, but the background and sky are a shade of pink. The pink got pinker as the images dried and the dark foregrounds got darker. I’m not sure if this is because the film sat out of the fridge for a week while we were in Boston or if its just a a symptom of the expired film or somehow due to the foggy conditions. Either way, I really enjoy how the fog makes the barn and the distant woods somewhat ephemeral and ghostly.
 Foundations